Dataverse Web API 101

Dataverse is low-code/no-code friendly data service for storing both structured and unstructured data behind a role-based security model. Dataverse is a pillar of Microsoft’s Power Platform and the backbone of Microsoft’s Dynamics 365 first party applications. Dataverse is designed to be as easy-to-use and robust for small workloads while also being scalable and performant enough to handle enterprise workloads on a massive scale.
In addition to being used with it’s numerous integrations with other Microsoft and 3rd party products, Dataverse also supports direct interfacing via the Dataverse Web API, a RESTful API. This article is intended to get you started with using the Dataverse Web API. By the end of the article, you will be prepared to start querying the Dataverse API!
Medium
Since the Dataverse API is web-based, all requests must go through the Hypertext Transfer Protocol (HTTP). This is just a fancy way of saying each request to the API will look similar to a URL, like what you’d see in your browser.
We have to be able to customize components of each HTTP request: URL, request headers, body, etc. Because of this, we will be using Postman, a free application for customizing these components of an HTTP request, sending to the API, and receiving the response.
You can download Postman here: Postman Download
Authentication
Authentication will likely be the most challenging aspect of this article. There are two ways that I will document how you can authenticate; the first is the “correct” way of doing things, and the second is a faster, easier to understand way.
When calling the Dataverse API, you don’t directly provide your credentials (username/password) each time you make a single request. Instead, you authenticate with the API once, an Access Token is provided to you, and you then provide this Access Token to the API each time you make a request. Keep in mind that this token does expire however (usually in 60 minutes from the time it was received), so after the expiration time, you’ll have to do it again to get a new token!
Authenticating via an Access Token Request
One can make an HTTP POST request with the following characteristics to receive an access token:
- HTTP Method:
POST - URL:
https://login.windows.net/common/oauth2/token - Body:
x-www-form-urlencodedformat with the following values: grant_type:passwordclient_id:51f81489-12ee-4a9e-aaae-a2591f45987dresource: (the URL of your Dataverse environment)username: (your username)password: (your password)
After constructing the request as specified above, hit send! If all goes well, you’ll receive a response like the following:
{
    "token_type": "Bearer",
    "scope": "user_impersonation",
    "expires_in": "4817",
    "ext_expires_in": "4817",
    "expires_on": "1655742922",
    "not_before": "1655737804",
    "resource": "https://org9422ae7b.crm.dynamics.com/",
    "access_token": "eyJ0eXAiOiJKV1QiLCJhbGciOiJSUzI1NiIsIng1dCI6ImpTMVhvMU9XRGpfNTJ2YndHTmd2UU8yVnpNYyIsImtpZCI6ImpTMVhvMU9XRGpfNTJ2YndHTmd2UU8yVnpNYyJ9.eyJhdWQiOiJodHRwczovL29yZzk0NDJhZTdiLmNybS5keW5hbWljcy5jb20vIiwiaXNzIjoiaHR0cHM6Ly9zdHMud2luZG93cy5uZXQvMWU4NWYyM2YtYzBhZi00YmNlLWJiOTYtOTIwMTRkM2MxMzU5LyIsImlhdCI6MTY1NTczNzgwNCwibmJmIjoxNjU1NzM3ODA0LCJleHAiOjE2NTU3NDI5MjIsImFjciI6IjEiLCJhaW8iOiJFMlpnWUFqOCtZZWhjTVZoNXI0NHVZYWNpeFVHRTFOZDJJUnlXUXNxR2RiNVBabmI5Z3NBIiwiYW1yIjpbInB3ZCJdLCJhcHBpZCI6IjUxZjgxNDg5LTEyZWUtNGE5ZS1hYWFlLWEyNTkxZjQ1OTg3ZCIsImFwcGlkYWNyIjoiMCIsImZhbWlseV9uYW1lIjoiQWRtaW5pc3RyYXRvciIsImdpdmVuX25hbWUiOiJTeXN0ZW0iLCJpcGFkZHIiOiI0Ny4yMDIuMTIuMjgiLCJuYW1lIjoiU3lzdGVtIEFkbWluaXN0cmF0b3IiLCJvaWQiOiIzNTAzYzUzMy1kZmI5LTRlNDktYmNhZC00N2VkYzgzYzA2NTUiLCJwdWlkIjoiMTAwMzIwMDEzQzIxQTM5MyIsInJoIjoiMC5BWHdBUF9LRkhxX0F6a3U3bHBJQlRUd1RXUWNBQUFBQUFBQUF3QUFBQUFBQUFBQjhBQUUuIiwic2NwIjoidXNlcl9pbXBlcnNvbmF0aW9uIiwic3ViIjoiQkpPeTdRcFJRYk1TTTVjLS1zZlh5aVEyU2t3ZThqdkdzWHNiR0ZuWXlsWSIsInRpZCI6fjFlODVmMjNmLWMwYWYtNGJjZS1iYjk2LTkyMDE0ZDNjMTM1OSIsInVuaXF1ZV9uYW1lIjoiYWRtaW5ARDM2NURlbW9UUzkwOTE5Ni5vbm1pY3Jvc29mdC5jb20iLCJ1cG4iOiJhZG1pbkBEMzY1RGVtb1RTOTA5MTk2Lm9ubWljcm9zb2Z0LQNvbSIsInV0aSI6Ii1oX1BmdWVySDAydlMzWkRDeEZ6QVEiLCJ2ZXIiOiIxLjAiLCJ3aWRzIjpbIjYyZTkwMzk0LTY5ZjUtNDIzNy05MTkwLTAxMjE3NzE0NWUxMCIsImI3OWZiZjRkLTNlZjktNDY4OS04MTQzLTc2YjE5NGU4NTUwOSJdfQ.B7-xfXv5UwPiYyrmbhpRlEOqOSs7aOranemqzFrAJx3h52D_tB2RjRj4rizuhKQTZ4XtyDcNZYMCmj57G64h2ICFXopm3dfpMmZ_hZ6qHD7zwRrQK2oQHUCpxtuyeT17ssLorFuWxZYfQYMxhjQYqu7WFWRX42IMBYeUqV7zGnnJmtMN1piaeasaSENVlo5IAxVyPfQyWv1roc-IjqNhxBB8Egnl3cez8sFDXY5JwwAcxpBRzHcF3HzLsQYqQ28bloUE44Za4JTR0tGushPl34AKdMblZYmCgysZiMH1Gyw8rYyJD2NeImV6Mo0cNvEnkS5tMzhDfMglHCSq92mjttQ",
    "refresh_token": "0.AXwAP_KFHq_Azku7lpIBTTwTWYkU-FHuEp5Kqq6iWR9FmH18AAE.AgABAAEAAAD--DLA3VO7QrddgJg7WevrAgDs_wQA9P-jUK3eXBOWMvudf1yc-687D2O37fykNKvvoBi5VlWc0NLQCqKg-goiG6RGG66CFhyrBYHBscQN6tybyDbb3m9toQ7boa3gKqwqWYA2jUoQ1JFPr8SH1mebCy5RUPXCeGFrksWe1iFJfr-SFCWLh2wpBSRmiX0yZ02nbsDQNXZdNln7FVEcNvGzbFyzlqi-gIS-9FP6rSx82jcs1GJV2OxUkYIE0Bv6x2oPTtZYU78LuERPyxYQ4AxjQmpvzdWpVqidQ5UptW-QSgIpKq_jUFRUas9YZhJNCPNxN5BIUIVLMKFwxRWT3GA5GunjBK6BeUWRr_nI1wU_6G-A_bzxzbXCq5hZB1SsxrEQQDTaWvN8cjG5PPTSnXI6phmi38c-BI_zV2QxXuejPi4FPzWrSaWoru6R3HR7jBCMb6Amueyqks7Zuipbq3GkH-WWxQe26Y0echvDHm2_MkVaxDulQfesR25PFjvkzvFdOy9emLZFIOCmrNJK54gOnhcbn_kdDWQNEwzkOAtO1c6WK6mRKAkXnfObmTc0QsVkkC7YxY704B35ys-i8cYFJM69MDRcWbRg6M-Z4-cR3GCAsGi9_ZcdMXxnClQ-DefVYuc_dY-pWsH62DT92LF048ho1Nh2i3qhxcUWKGxk8ODukHeUNs5Z3504h7T1ssCwZQa65AERRT9ote2Rgi1U0NlOsz0STV9NGzktZK0iiDzLTtzCuEOw_JSr"
}
Altogether, your request and response should look like this:
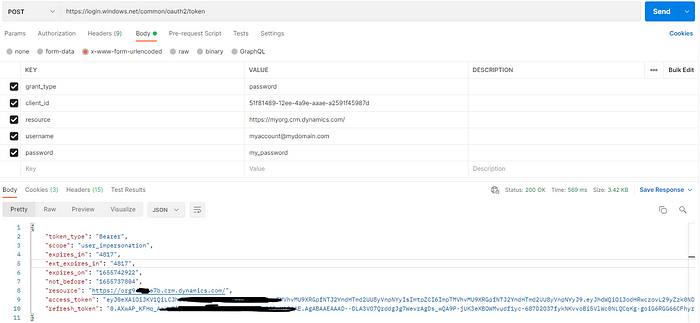
The access_token property (beginning with "eyJ" and ending with "ttQ") is what we're after. We will supply this to all future requests.
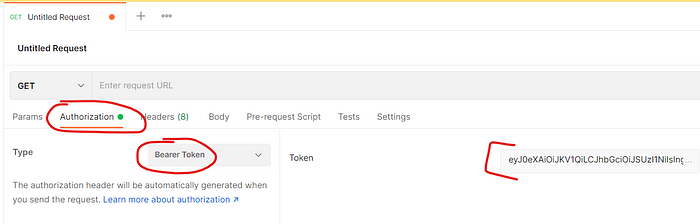
We must supply this value as a Bearer Token, a specific format for providing an access token via an API. Open a new request in Postman. Go to the Authorization tab and change the Type dropdown to Bearer Token. Paste the value of the access_token into the token field:
Using Cookies from your Browser
When you are logged into a part of the Power Platform — say Power Apps, for example, a cookie will be added to your browsing session so you don’t have to re-authenticate on every page! We are actually able to “intercept” this cookie from the web browser and use this in our requests.
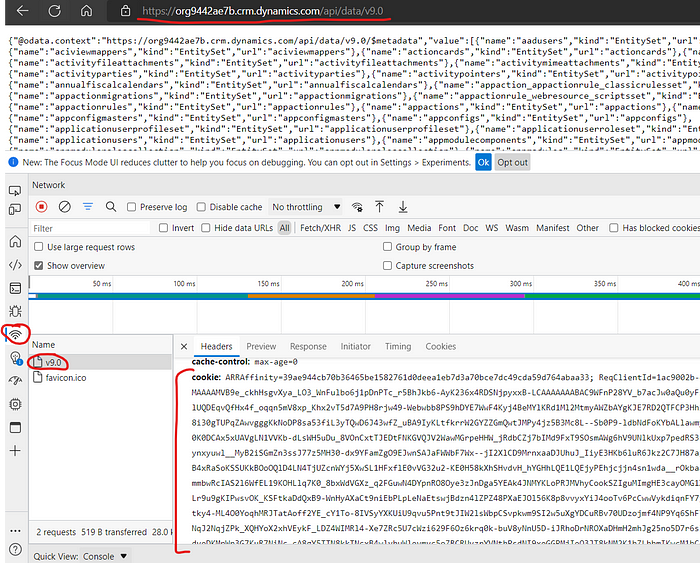
To get this cookie, we first need to know the URL of your Dataverse environment. From the Power Platform Admin Center, open your environment. Your will find this URL listed as the Environment URL. For example, mine looks like this: https://org56f8d45d.crm.dynamics.com/.
Append /api/data/v9.0/ to this environment URL, so it looks like this: https://org56f8d45d.crm.dynamics.com/api/data/v9.0/. From your authenticated browser session, navigate to this URL. You should receive a list of tables that exist in this environment.
Open your browser’s developer tools (I am using Microsoft Edge) with Ctrl+Shift+I. With the developer tools open, refresh the webpage. You should see a network log labeled v9.0. Click on this. In the headers tab (opened by default), scroll down to find the cookie header. Copy the value of this header; this is what we will be using!
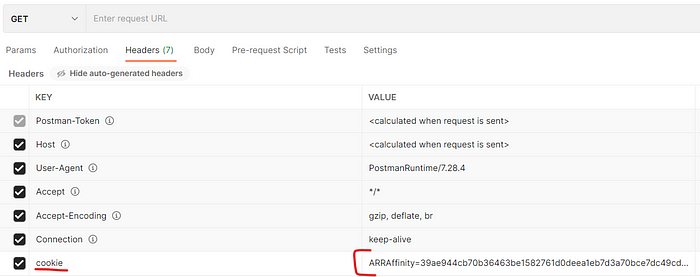
In each request we make via Postman, we must provide this value in the headers, labeled as cookie. Open a new request in Postman. Add this value to the headers with the label cookie, like below:
The OData Protocol
The Dataverse API follows the standards described by the Open Data Protocol (“OData”). OData is a set of best practices for building and consuming RESTful API’s. Breaking this down, this means that the Dataverse API follows a standard that makes querying easy and understandable, with a format of which is almost universally understood. Some of the features of OData include:
$filter: filtering results$select: selecting only specific fields to be returned$orderby: sorting the returned results$count: receiving a count of the queried records$top: limiting the number of records returned Each of the parameters above can be passed into the query URL in a read request to the Dataverse API. For more information about OData: OData queries.
Dataverse Read Operation
Now that we have a request in Postman equipped with the necessary data to authenticate, we can begin making calls!
List Tables
Firstly, make a GET request (the drop down near the URL in Postman) to the following URL: https://org9442ae7b.crm.dynamics.com/api/data/v9.0 (obviously replacing org9442ae7b with your org name).
If successful, you will receive back a list of tables in your Dataverse instance, in JavaScript Object Notation (JSON) format. It will look like this (this is truncated, but you get the point):
{
    "@odata.context": "https://org9442ae7b.crm.dynamics.com/api/data/v9.0/$metadata",
    "value": [
        {
            "name": "accounts",
            "kind": "EntitySet",
            "url": "accounts"
        },
        {
            "name": "contacts",
            "kind": "EntitySet",
            "url": "contacts"
        },
        {
            "name": "phonecalls",
            "kind": "EntitySet",
            "url": "phonecalls"
        },
        ...
In each object in the value property, we can see the name of the table, the type, and the url to access the data in the table.
Read records from a table
To get a list of records (data) that exist in each table, simply append one of the url properties to the URL that we used above to list the tables. For example, to get contacts: https://org9442ae7b.crm.dynamics.com/api/data/v9.0/contacts.
The response will return every field of every record in the contacts table. To limit the number of responses we get to 5, you can append $top=5 to the URL as a parameter, like so: https://org9442ae7b.crm.dynamics.com/api/data/v9.0/contacts?$top=5.
You just appended an OData parameter to your URL! By stacking the OData parameters mentioned earlier, you can create more complex queries.
Read a single record
If we know the GUID (“Global Unique Identifier”, a primary key) of a single record in a table, you can request data for only that record by including it in parentheses. For example, requesting a single record with ID 8e27ee97-cbe1-ec11-bb3d-00224803b8c6 from the contacts table: https://org9442ae7b.crm.dynamics.com/api/data/v9.0/contacts(8e27ee97-cbe1-ec11-bb3d-00224803b8c6). You will see that the response does not return an array of objects, but rather a single object.
Dataverse Write Operation
In addition to reading from Dataverse, we can also use the Web API for writing to Dataverse.
Create a New Record
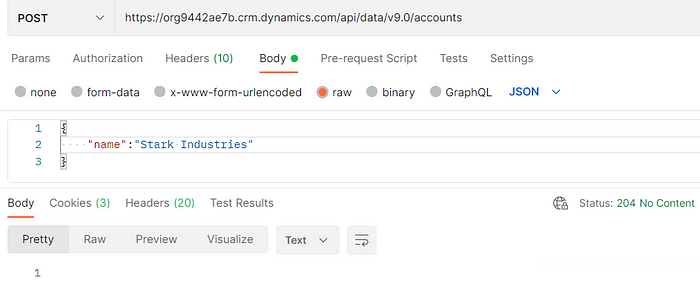
Make a new request in Postman. Add the necessary authentication data, as described above in the Authenticate section. Set the HTTP method to POST and set your target URL to https://org9442ae7b.crm.dynamics.com/api/data/v9.0/accounts (obviously replacing org9442ae7b with your org name). This means our intention is to create a new account record.
Navigate to the Body column. Select raw as the body type, and JSON as the format. The Dataverse Web API accepts the data of the record in JSON format. To set the name of the account we would like to save, set the body to the following:
{
    "name":"Stark Industries"
}
Hit send! If you receive a 204 No Content response, you have succeeded. Pull up the list of accounts in a model-driven app and now you should see your new account has been made.
Update a Record
As per the OData standard, we can only update a single record at a time via the Dataverse Web API. To do this, we must know the GUID (primary key) value of the record we wish to update. For example, changing the name of the account record with ID a33dd8e6-b6f0-ec11-bb3d-000d3a357ea4:
- Set the HTTP method to
PATCH - Set the URL to
https://org9442ae7b.crm.dynamics.com/api/data/v9.0/accounts(a33dd8e6-b6f0-ec11-bb3d-000d3a357ea4)(obviously replacingorg9442ae7bwith your org name anda33dd8e6-b6f0-ec11-bb3d-000d3a357ea4with a GUID of a record in your account table) - Similar to above, set the Body of your request to raw and the format to JSON with the following content:
{
    "name":"Tesla Inc"
}
After sending this request, you will again receive a 204 No Content response if the update was successful. If you make a read call for the accounts table using the methods outlined earlier, you should see your change reflected.
Delete a Record
So far we’ve seen how to create a record, read a record, and update a record. Finally, we will explore how you can delete a record. Just like with update requests, the OData standard does not allow for deletion of multiple records in a single request. Thus, again, we must know the GUID of the record we would like to delete. For example, deletion of the account record with ID a33dd8e6-b6f0-ec11-bb3d-000d3a357ea4:
- Set the HTTP method to
DELETE - Set the URL to
https://org9442ae7b.crm.dynamics.com/api/data/v9.0/accounts(a33dd8e6-b6f0-ec11-bb3d-000d3a357ea4)(obviously replacingorg9442ae7bwith your org name anda33dd8e6-b6f0-ec11-bb3d-000d3a357ea4with a GUID of a record in your account table) - Note that this is the same URL that we used above for the update. The only difference between the update and delete operation is the HTTP method used.
Unlike the update operation, we obviously will not need to provide content in the request Body because this is merely a delete operation — no data should be changed. Be sure you have none selected under the Body tab.
After specifying the above in your request, press send. If you receive a 204 No Content response, this means your delete request was successful. The targeted record with the ID that you specified is now deleted.
Summary
There is a lot more to what the Dataverse Web API can provide, but I hope this tutorial was enough to get you started with using, but more importantly understanding the Dataverse Web API. The Dataverse Web API follows the OData standard, and thus, the more you learn about the OData protocol, the more capable you will be of working with the Dataverse Web API.
Written by Tim Hanewich, Business Applications Technical Specialist @ Microsoft (alias TIMH)